# T2.4 \[opt] Draw a cube and rotate
## Add cube vertices
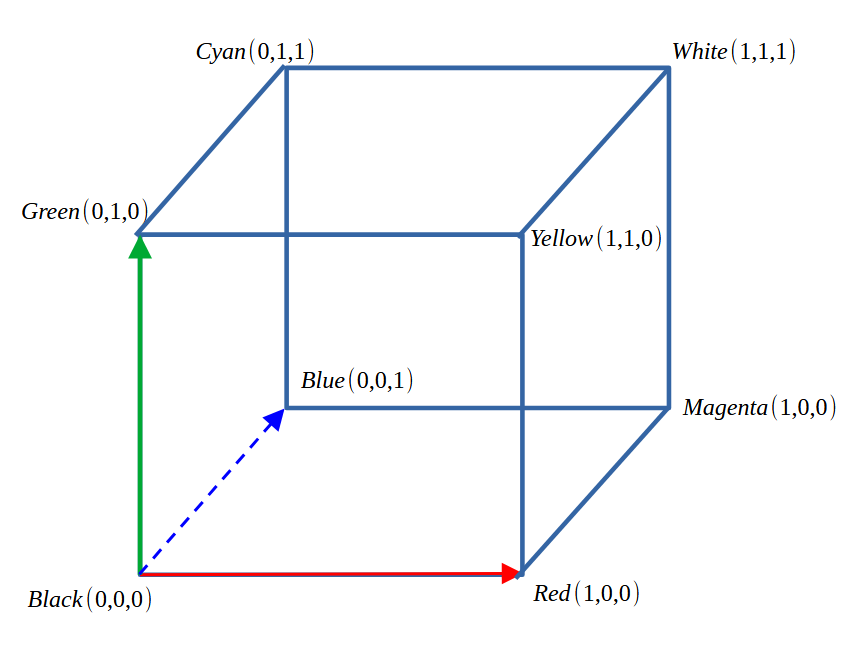
One cube has 8 vertices. Set the Z value of current 4 vertices to 1.0. Copy the existing 4 vertices and replace its third component with -1.0.
It will give us all the 8 vertices needed.
```cpp
// cube vertex data with RGB colour components
GLfloat verts[] = {
-1.0f, 1.0f, 1.0f, // v0
0.0f, 1.0f, 0.0f, // v0 colour green
-1.0f, -1.0f, 1.0f, // v1
0.0f, 0.0f, 0.0f, // v1 colour black
1.0f, -1.0f, 1.0f, // v2
1.0f, 0.0f, 0.0f, // v2 colour red
1.0f, 1.0f, 1.0f, // v3
1.0f, 1.0f, 0.0f, // v3 colour yellow
-1.0f, 1.0f, -1.0f, // v4
0.0f, 1.0f, 1.0f, // v4 colour cyan
-1.0f, -1.0f, -1.0f, // v5
0.0f, 0.0f, 1.0f, // v5 colour blue
1.0f, -1.0f, -1.0f, // v6
1.0f, 0.0f, 1.0f, // v6 colour magenta
1.0f, 1.0f, -1.0f, // v7
1.0f, 1.0f, 1.0f, // v7 colour white
};
```
## Colour assignment
The colour assignment as as follows
## Set indices of triangles
```cpp
// indices of 12 triangles of a cube
GLuint indices[] = {
0, 1, 2, 0, 2, 3,
1, 5, 2, 5, 6, 2,
0, 3, 4, 4, 3, 7,
3, 2, 7, 2, 6, 7,
1, 0, 4, 1, 4, 5,
7, 6, 4, 4, 6, 5
};
```
in drawTriangles() change the number of vertices you are going to draw
```cpp
// draw triangle using indices
glDrawElements(GL_TRIANGLES, 12 * 3, GL_UNSIGNED_INT, 0);
```
## enable depth test in main()
add glEnable(GL\_DEPTH\_TEST)
add GL\_DEPTH\_BUFFER\_BIT in glClear()
```cpp
initTriangle();
// setting the background colour, you can change the value
glClearColor(0.25f, 0.5f, 0.75f, 1.0f);
glEnable(GL_DEPTH_TEST);
// setting the event loop
while (!glfwWindowShouldClose(window))
{
glfwPollEvents();
glClear(GL_COLOR_BUFFER_BIT | GL_DEPTH_BUFFER_BIT);
drawTriangle();
glfwSwapBuffers(window);
}
```
Set the orthographic projection matrix
To show hidden surface correctly, we need to set up a basic orthographics projeciton matrix
Add projection matrix uniform in colour.vert and and use that to calcuate gl\_Position
```glsl
#version 410
in layout(location=0) vec3 pos;
in layout(location=1) vec3 colour_in;
// transformation in the world and camera space
uniform mat4 modelview;
uniform mat4 projection;
out vec3 colour_vert;
void main()
{
// homogeneous coordinate
gl_Position = projection * modelview * vec4(pos, 1.0);
colour_vert = colour_in;
}
```
Connect the projection matrix to your glm orthographic matrix at the end of initTriangle()
```cpp
glm::mat4 mat_projection = glm::ortho(-1.0f, 1.0f, -1.0f, 1.0f, -1.0f, 1.0f);
GLuint modelview_loc = glGetUniformLocation( shader.program, "modelview" );
glUniformMatrix4fv(modelview_loc, 1, GL_FALSE, &mat_modelview[0][0]);
// you must set the orthographic projection to get correct rendering with depth
GLuint projection_loc = glGetUniformLocation( shader.program, "projection" );
glUniformMatrix4fv(projection_loc, 1, GL_FALSE, &mat_projection[0][0]);
```
Now you can see
Play it with scale, rotation and translation.
The following is scale by 0.5, rotate around Y axis by 45 degrees and then rotate around X axis by 30 degrees, as shown in the code
```cpp
glm::mat4 mat_scale = glm::scale(glm::vec3(0.5f, 0.5f, 0.5f));
glm::mat4 mat_rot = glm::rotate(glm::radians(45.0f), glm::vec3(0.0f, 1.0f, 0.0f));
glm::mat4 mat_rot2 = glm::rotate(glm::radians(30.0f), glm::vec3(1.0f, 0.0f, 0.0f));
// the order matters
glm::mat4 mat_modelview = mat_rot2 * mat_rot * mat_scale;
```